When multiple vendors ship goods in a single container, things can get messy - fast. Delays, confusion, misallocated costs, and inventory mismatches are all too common without a centralized system.
NetSuite’s Inbound Shipment feature is the hidden gem that solves this. It lets you consolidate multiple vendor POs into a single tracked shipment - giving operations, procurement, and accounting teams a shared source of truth.
In this guide, we’ll walk through how to use the feature, real-world use cases, and best practices to level up your supply chain coordination.
Why Use the Inbound Shipment Feature?
When you're dealing with consolidated freight or containerized imports from multiple vendors, tracking becomes chaotic without the right tools.
Common problems without inbound shipment tracking:
- Delays in receiving and processing inventory
- Confusion over which vendor’s items have arrived
- Inaccurate landed cost allocation
- Inventory mismatches from partial receipts
NetSuite's Inbound Shipment feature solves these by allowing you to:
- Group POs from different vendors into one shipment
- Track status and ETA in one place
- Automatically split item receipts by vendor
- Assign landed costs with precision
Real-World Use Cases
Manufacturing Company
-
A manufacturer sources parts from three suppliers overseas. All parts are packed in one container and shipped by sea.
-
With NetSuite, they create a single inbound shipment to track ETA, container number, and receive all three POs in one go—without losing visibility by vendor.
Retail Distributor
- A distributor orders from five vendors for a holiday restock. The products arrive in one air freight shipment.
- NetSuite splits the receipts per vendor, keeping accounting clean while the warehouse receives in bulk.
Step-by-Step Instructions
Step 1: Create Purchase Orders
- Navigate to Transactions > Purchases > Enter Purchase Orders
- Create POs for each vendor
- Ensure all are in Pending Receipt status
Step 2: Create a New Inbound Shipment
- Go to Transactions > Purchases > Create Inbound Shipment
- Click New, add shipment details (e.g., container number, ETA)
- Click Add Lines to link POs from different vendors
Example:
|
Vendor |
PO Number |
Item |
Quantity |
|
Vendor A |
PO1001 |
Widget A |
100 |
|
Vendor B |
PO2002 |
Widget B |
50 |
|
Vendor C |
PO3003 |
Widget C |
200 |
All these lines can belong to one inbound shipment like SHIP_ABC123.
Below is a sample Inbound Shipment form with the available fields and having multiple vendors:
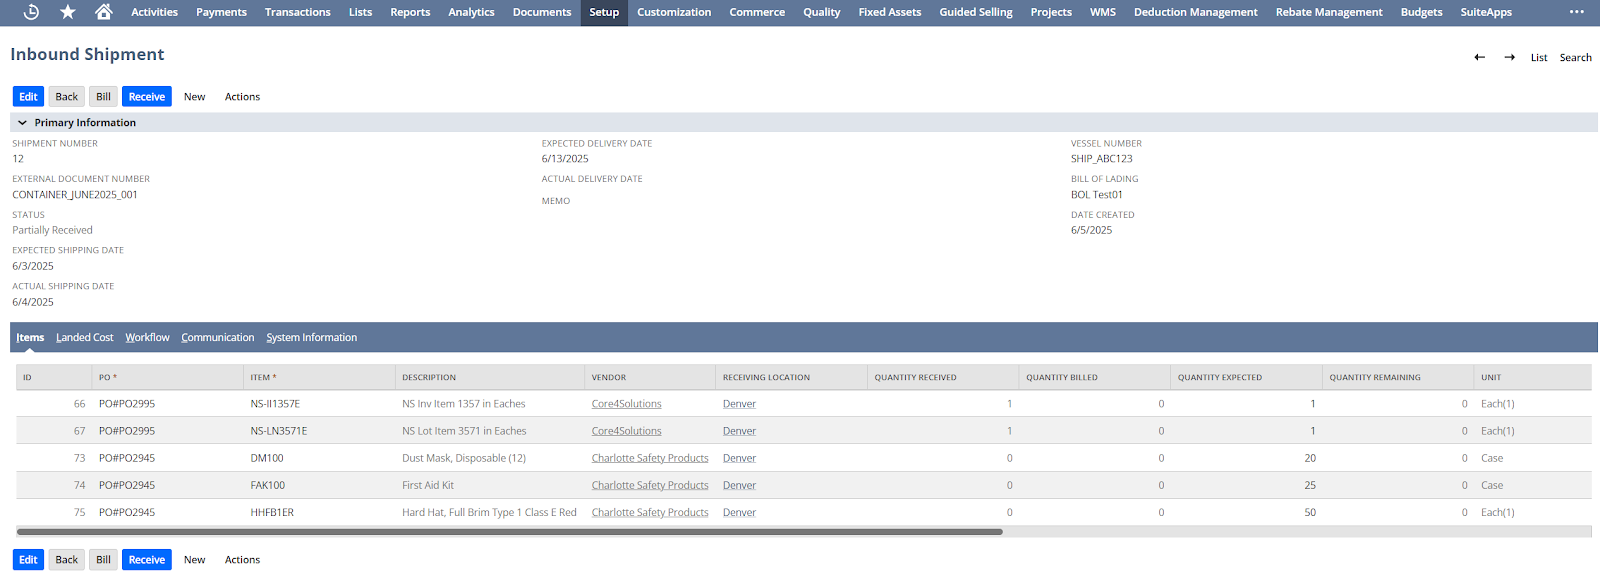
Step 3: Track Shipment Status
Use the Status field to track progress:
- To Be Shipped
- In Transit
- Partially Received
- Received
- Closed
This visibility keeps your teams aligned - especially for overseas or multi-week shipments.
Step 4: Receive Items
- Open the Inbound Shipment
- Click Receive
- NetSuite auto-generates separate item receipts for each PO/vendor
This ensures:
- No cross-vendor confusion
- Clean audit trails
- Accurate accounting
Step 5 (Optional): Allocate Landed Costs
- Assign freight, customs, duties, and other costs to the shipment
- NetSuite allocates them across POs/items based on your chosen method (e.g., by quantity, value, or weight)
4 Tips & Best Practices
Use Clear Naming Conventions
- Ex: CONTAINER_JUL24_CN_001
- Makes it easier to search and reference in warehouse ops or audits.
Leverage Saved Searches
- Create views by ETA, vendor, or status to keep inbound logistics visible to all stakeholders.
Don’t Mix Fulfilled POs
- Only include POs that are Pending Receipt - NetSuite won’t let you add closed or fully received ones.
Configure Landed Cost Properly
- Ensure your landed cost categories and allocation methods are set up to avoid errors and manual rework.
The Inbound Shipment feature is more than a logistics tool - it’s a control center for receiving operations. When used effectively, it reduces friction, prevents inventory errors, and improves financial accuracy.
If your business regularly receives consolidated shipments or imports from multiple suppliers, implementing this feature is a no-brainer. You’ll eliminate spreadsheets, streamline warehouse processes, and give every team - from ops to finance - the clarity they need.
Talk to a NetSuite Expert
Tell us what you're working on, and we'll help you figure out the next step.