
Other chapters in this series:
Welcome to the final part of our Go-Live Success blog series! In this section we will cover setting up trial balances and cleaning up bank reconciliations in NetSuite.
Congratulations on making it this far! Now that inventory, accounts payable, and accounts receivable balances have been established, you can now operate directly out of NetSuite to manage inventory, receive customer payments, and pay vendor bills. It is important that everyone switches over to use NetSuite at this time to ensure that all data is being captured correctly in your new system.
The last part of the cutover process is entering the remaining trial balances. This allows the ability to close accounting periods and generate accurate financial reports in NetSuite, and finally migrate away from your old system!
Here is a recap of all the transactions we have successfully migrated:
- Inventory Worksheets/Adjustments
- Invoices
- Vendor bills
- Journal Entries
The process has been to create these transaction types to establish inventory, A/R, A/P, and then to use journal entries to negate the GL impact of everything. If followed correctly, the trial balances for all accounts should be zero and we’ll have a clean slate to work with.
Entering trial balances can be much more of an art than a science, and largely depends on your requirements. For example:
- Are historical transactions required to manage specific business operations, such as NetSuite’s Demand Planning or Advanced Inventory Management modules?
- Does your business have data retention policies with respect to preserving historical or financial data?
- If historical data is required, will it be completed prior to go-live, or will additional historical data loads be completed after the initial go-live?
- How easily can you access and export historical data from your existing system, and how much additional work will be required to format and upload it into NetSuite?
- How far back in time will account balances be entered?
- Were there any changes to the chart of accounts when migrating from the old system?
Importing a significant amount of historical transactions is very complex and time-consuming —so much so, that it can require a concerted effort over a few months. In cases like these, it is important to develop a phased approach to prioritize short-term requirements, while ultimately addressing the long-term requirements.
For the purposes of this blog post, we are using the following assumptions:
- All periods up to the most recent accounting period have been closed (GL has been locked and financial reporting has been generated)
- Historical transaction detail is not required - a single journal entry per period is sufficient
- Only the ending balances are required for each accounting period in the current year
- There aren’t any advanced reporting requirements from the legacy system, so the standard Trial Balance and Financial Statement reports are sufficient
- There is only one subsidiary, which does not require OneWorld (otherwise, journal entries would be created per accounting period per subsidiary)
Given these assumptions, here is the sequence of events that are required to setup trial balances:
- Create a Journal Entry to reflect the ending balance of the previous fiscal year
- Create Journal Entries for each accounting period in the current year
- Recreate all uncleared transactions and adjust month-end JEs accordingly
- Enter missing transactions since the most recent accounting period imported
- Set up the initial bank reconciliation
Journal Entry for Ending Balances of Previous Fiscal Year
It’s much cleaner to establish ending balances in the fiscal year prior to the year you want to enter monthly balances for because the current trial balance could be a result of multiple years worth of activity. Dumping all that activity in the current year will throw off your reports. It’s best to isolate that activity in a previous year that will not be reported on, and focus on entering the monthly balances for the year(s) that do require accurate reporting.
Journal Entries for Each Accounting Period in the Current Year
Now that the previous year’s ending account balances are set up, the monthly balances for the current year need be entered. There are two approaches that you could use, each with their own pros and cons: Auto-reversing Journal Entries or Monthly Account Activity Journal Entries.
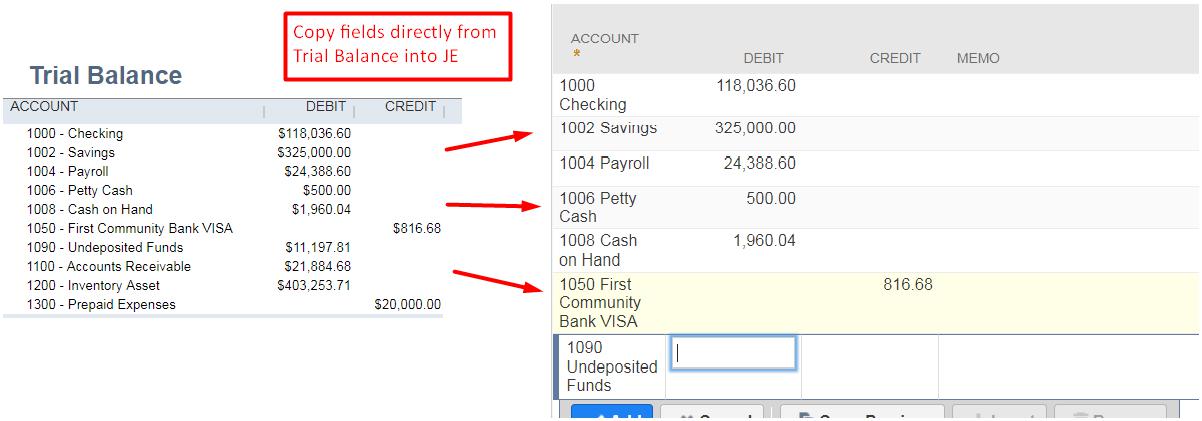
Auto-reversing Journals is the simplest method to use. The process is to export the Trial Balances for each accounting period, and then to create a journal entry for each of those periods (using the trial balances). Most importantly, each journal will be dated within its respective accounting period, but will also have a reversal date in the following period.

With this approach, each journal entry will post the correct account balances for a given period, and then the reversing JE will negate the entire GL impact of the original JE, reducing the trial balance for all accounts back to $0. This allows each JE to be created directly from the trial balance, without having to consider the impact of previous entries.
Although this is the quickest and easiest method, there are some drawbacks. This approach relies on being able to post the trial balance in its entirety. If you were to require other historical transactions to be created, then those transactions would have to be factored in, which means you would not be able to simply use the trial balance report.
Additionally, each of these JEs is meant to independently post the trial balance for a given accounting period. If you needed to adjust one of the JEs (i.e. for a correction), then adjusting that JE will only affect the period it is posted in. In order for this adjustment to flow into future periods, you would also have to update the following JEs accordingly.
Alternatively, the second method involves the Balance Sheet and Income Statement. This approach is to calculate the monthly activity for all accounts on the Income Statement, and then do the same for all accounts on the Balance Sheet. Once you have both sets of data, you will combine them into one list, and then create the journal entry (either manually or via import).
For the income statement, running this report in a specific date range will give you the transaction amounts per account for that date range. Obtaining the monthly activity for income statement accounts is as simple as running it for each accounting period:
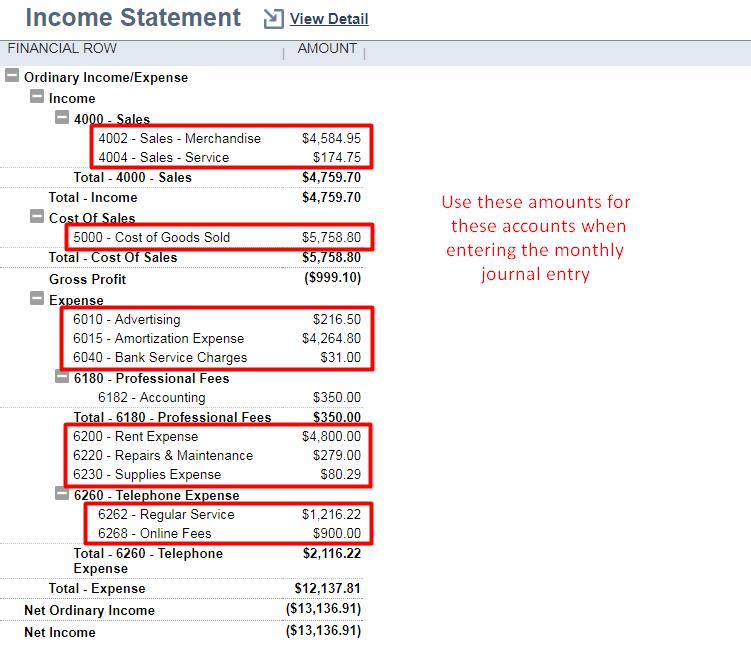
The only aspect to be mindful of is how positive and negative numbers are displayed and how that translates into the debit and credit amounts. Based on the example above:
- Income account types
- Positive = Credit
- Negative = Debit
- Expense account types
- Positive = Debit
- Negative = Credit
For balance sheet accounts, it’s not as simple as copying the amounts directly from the Balance Sheet. Since the Balance Sheet shows the running total for each account as of a specific date, we need to take the difference between the current period and the previous period’s ending balance.
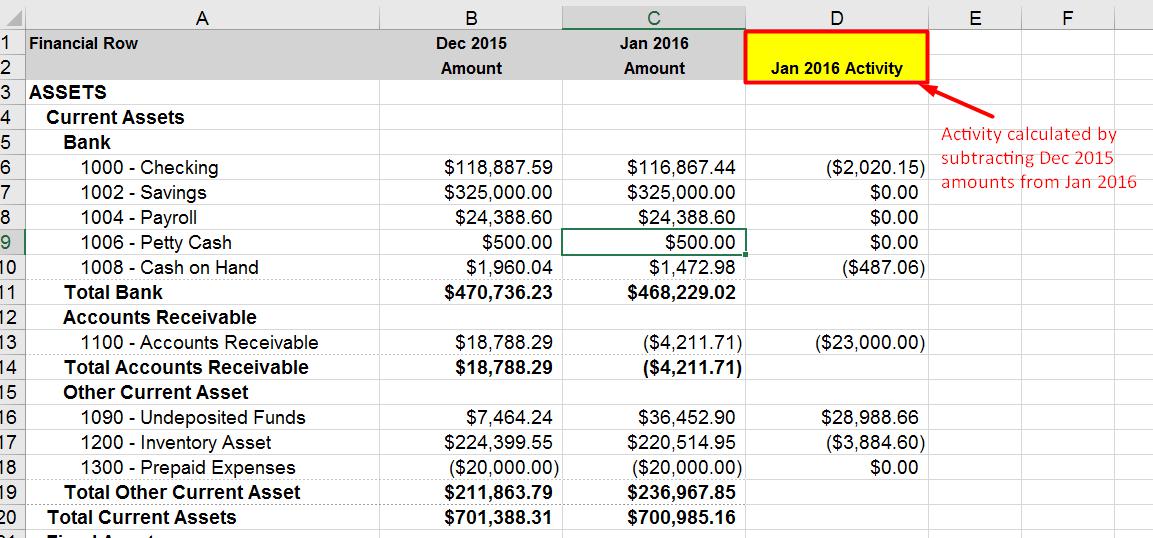
These amounts will be used in the month end journal entry. Again, please note that positive and negative numbers are treated differently based on the account type:
- Asset account types
- Positive change = Debit
- Negative change = Credit
- Liability, Equity account types
- Positive change = Credit
- Negative change = Debit
Now that we have all of our amounts for this accounting period, we can combine both the Balance Sheet and Income Statement accounts to create the journal entry:
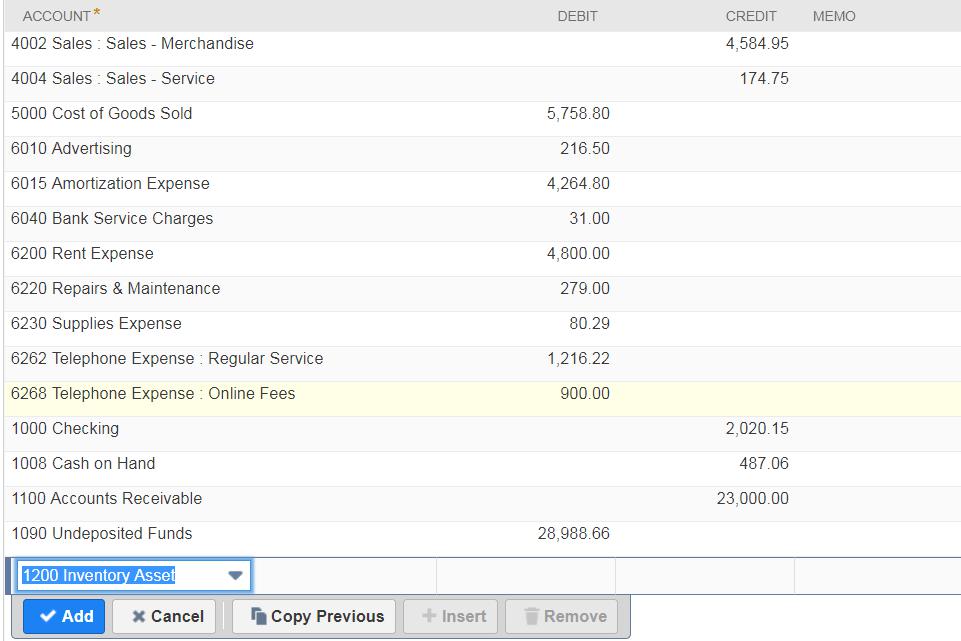
When done, click Save to create the ending balance journal entry for the first accounting period! Repeat these steps for all accounting periods in the fiscal year, up to the most recent accounting period. When there are many accounts to enter balances for, it’s important to note that these journal entries can be prepared in a spreadsheet and imported into NetSuite.
Needless to say, this approach is not as simple and straightforward as the auto-reversing JEs method, and requires more effort to setup properly. However, posting the actual monthly activity for each period will make it easier to handle any adjustments, as changing the monthly activity in any of these periods will be reflected in future periods. Additionally, viewing the monthly activity in the account register detail is much more intuitive than sifting through a bunch of auto reversing balances each month.
Here is a table to summarize the pros and cons of each approach:
| Method | Pros | Cons |
|---|---|---|
| Auto-reversing JEs | - Simple process - No additional calculations required after exporting trial balances |
- Harder to update these JEs if adjustments will be required at a later time |
| Monthly Account Activity JEs | - Easier to enter adjustments at a later date - Easier to understand when viewing the account register detail |
- Requires additional effort to calculate each month’s activity - Requires additional effort to format the import file |
Recreate Uncleared Transactions and Adjust Month-End JEs
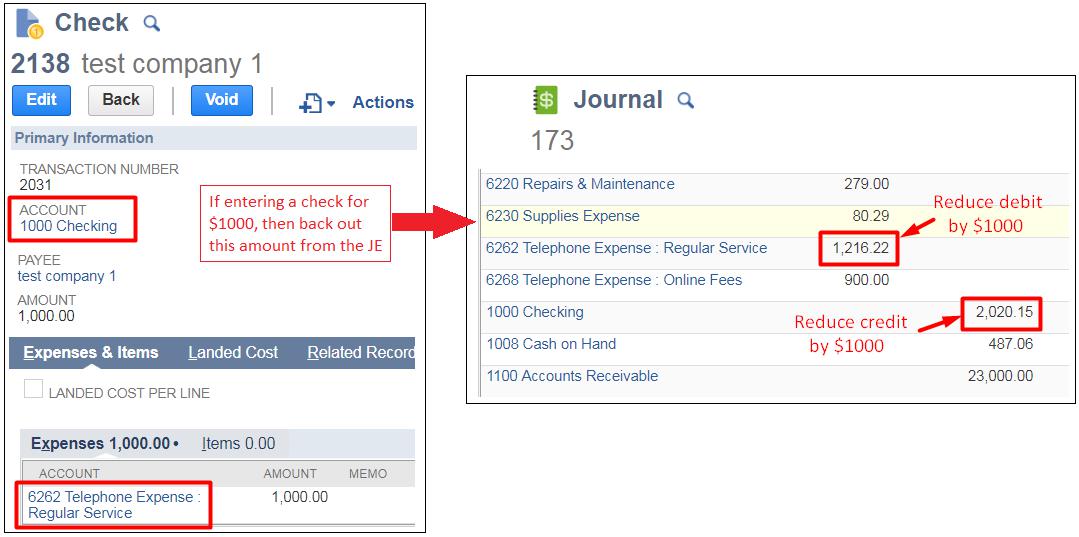
Often times, the bank balance recorded in NetSuite will not match with the exact amount in your bank account. The variance that exists is due to transactions entered in NetSuite that have not cleared your bank yet, such as uncleared checks sent to vendors or funds that have not been deposited yet. These transactions are important to identify in order to fully reconcile your bank account.
In order to mark them as uncleared during the bank reconciliation process in NetSuite, we first need to create each uncleared transaction in NetSuite. Since the month-end journal entries for each accounting period will already include the GL impact of these uncleared transactions, the next step is to back out the same amount from the respective month-end journal entries. In the end, the net GL impact of our actions is zero, but we will now have a separate transaction recorded for each uncleared bank activity.
As an alternative, do not create these transactions in NetSuite and keep track of them offline instead. This will omit the time and effort required to recreate them in NetSuite and back out their amounts from existing month-end JEs. There would then be an inherent variance between the NetSuite bank reconciliation and the actual reconciliation. This variance must be managed and supported offline until all of these uncleared transactions clear your bank account, at which point NetSuite will be in sync with your actual bank balance.
Personally, I do not like this approach. Since the goal of switching systems is to be able to manage all accounting in NetSuite, it seems counterproductive to purposely track transactions offline. Although it can require a lot of time to enter these uncleared transactions in NetSuite, the amount of work and confusion you avoid each accounting period is worth it. Furthermore, there can be cases where checks issued to vendors never get deposited, which can stay on your uncleared transaction list indefinitely.
Enter Missing Transactions Since the Most Recent Accounting Period Imported
Once you’ve entered inventory, A/R, A/P balances, and closed the last accounting period, there may have been a situation that caused a minor delay to the planned cutover date. If this were to happen, it is likely that there are additional transactions entered in the old system since the last accounting period. For example, if the the last accounting period close date was 10/31/17, but the cutover to NetSuite didn’t occur until 11/6/17, there will likely be five days of transactions in the old system from 11/1/17 to 11/5/17.
In this case, the next step is to replicate all the transactions created in the old system during this date range. Ideally, the NetSuite cutover would occur as soon as possible after the last accounting period close, which would minimize the days that need to be accounted for.
If there are a significant number of transactions to reproduce, there is the option to import the transactions (each transaction type will require its own file and import). Otherwise, it’s best to do this manually with your team, as you can validate each transaction before reproducing it in NetSuite. This also presents a great opportunity for your team to get hands-on experience entering different transaction records into NetSuite.
However, it is important to understand the issues that this delay could cause for the cutover process. If there are significant issues that force the team to scramble and make up for the delay, then it might be worth pushing the cutover process to the next accounting period instead.
Set up the Initial Bank Reconciliation
At this point in the process, there should be monthly balances for each accounting period of the current fiscal year, all uncleared transactions are available to view, and all transactional activity up to today should be accounted for in NetSuite. The final step is to set up the initial bank reconciliation, so you are all set to close the next accounting period entirely out of NetSuite.
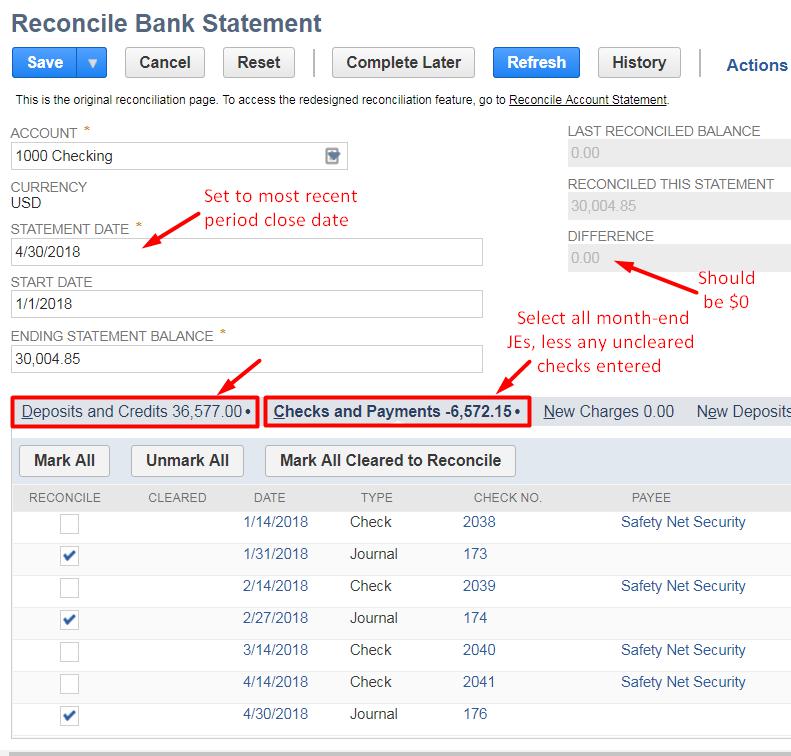
Fortunately, this should be very simple - especially since we’ve broken out all of our uncleared transactions as of the most recent accounting period close date. Open the bank reconciliation page by navigating to Transactions → Bank → Reconcile Bank Statement.
Select the bank account and enter the most recent accounting period close date. Under the “Deposits and Credits” and “Checks and Payments” tabs, select all the month-end journal entries, but do not select any of the uncleared transaction records that were created. Once you enter the ending statement balance, the calculated reconciliation amount should be the same as the actual bank balance, and the difference should come out to zero. Once done, save the bank reconciliation and you are all set up!
That concludes the final post about establishing opening balances in NetSuite. Overall, this series has covered a standard cut over process that focuses on transitioning to NetSuite quickly and easily. Of course, each business will have specific requirements and unique nuances that can affect this process. These must be addressed early in the implementation, as those requirements can have a significant effect on your implementation plan and timeline.
Hope you enjoyed this blog series!
Leave us your comments below!
Contact Techfino with any questions.
Talk to a NetSuite Expert
Tell us what you're working on, and we'll help you figure out the next step.