Guide to SuiteBundling in NetSuite
By Nick Klug
As a NetSuite Solution Partner, Techfino is often helping customers implement NetSuite and using SuiteBundles to easily copy configuration and customizations created in another NetSuite Account. As an SDN Partner, we use SuiteBundles to create SuiteApps to deploy our CleanSweep Products using the SDN SuiteApp Deployment Framework championed in the SAFE Guide. As a technical consultant at Techfino, I manage deployment changes with SuiteBundling for several clients, which includes several of our largest and most in-depth client customizations to date. In this blog, we will investigate SuiteBundling, its applications, technical and non-technical considerations, and how to avoid a few common mistakes.
For those not familiar with SuiteBundling, it may be easiest to think of it as NetSuite’s way of packaging up a discrete set of customizations (e.g. custom records, fields, or dashboards) or configurations (e.g. chart of accounts, transaction numbering, and enabled features) and allowing you to copy them from one source NetSuite account to another destination NetSuite account, much like installing a program on your computer or iPad. SuiteApp.com is akin to Apple’s “App Store” where you purchase and install NetSuite “apps” called SuiteApp’s. SuiteBundles (and SuiteApps) can be of almost any size and functionality, from a single script to everything contained within an environment excluding transactional data and standard records.
Some of the advantages of using a SuiteBundle over a manual deployment include:
-
Time savings - you no longer have to manually deploy what could potentially be hundreds of customizations, many requiring multiple screens of customizations
-
Consistency across environments - With bundle updates and deployments, you can ensure a much greater level of consistency across environments.
-
Locked to client - SuiteBundles can also be locked, preventing Users in the Target environment from making any changes to the locked objects in the bundle. This is an especially useful feature for a product you wish to Bundle and distribute to multiple clients and want to consistent behavior across multiple clients.
One of the common uses for SuiteBundling is to develop a customization in a Sandbox environment, bundle, and then deploy/update a production environment. This can be an effective process and easier than manual deployment, but there are several things to keep in mind:
-
Design - This includes processes that need custom records, forms, scripts, and what can be safely reused across them.
-
Documentation - This is critical to ensure that a change in one area doesn’t break customization in other areas. (Which goes hand in hand with design.)
-
Communication and involvement - If a team is left out of the process, it’s much easier to inadvertently negatively impact other customizations.
-
Change Management - We at Techfino have been utilizing Strongpoint in particular to assist us with managing changes and the deployment process, as the tools Strongpoint provides focus on Change Management controls, policies, environment comparisons, and detecting non-compliant changes. It also has an environment comparison tool for validating post SuiteBundle deployment. For now, I’ll leave a Strongpoint Guide and Analysis for another blog, but it ties in very nicely with the SuiteBundling process.
Now that you know what SuiteBundles are used for and why they are a great tool for publishing NetSuite changes, read on to learn everything you need to know about Creating and Updating SuiteBundles and Installing Bundles.
Creating and Updating SuiteBundles
Bundle Basics
If you navigate to Customization → SuiteBundler → Create SuiteBundle (or edit an existing bundle), you’ll reach the very first screen in the Bundle Builder shown below in Figure 1.
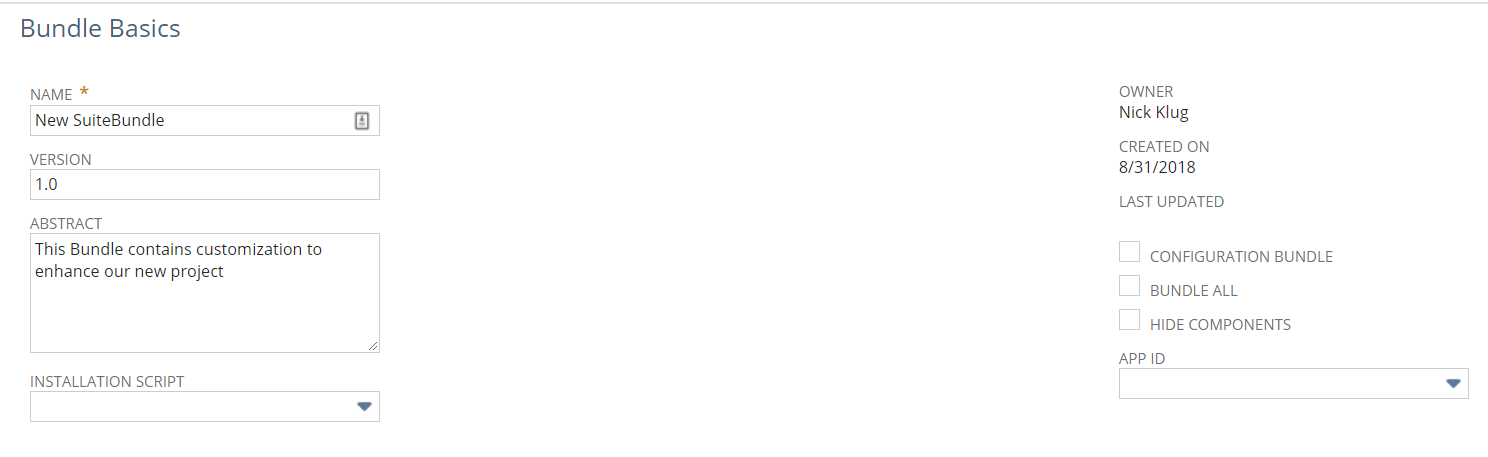
Figure 1. Step 1 - SuiteBundler Bundle Basics
Name - Choose a descriptive name for the SuiteBundle. If this bundle is being created for a Change Request, choose a name that reflects that.
-
Version - Always enter a version and update it whenever the bundle is updated. This makes it easier to see when a bundle has been updated and to track which environments have the most up to date bundles installed
-
Abstract - Enter a brief description of the contents and purpose of the bundle.
Bundle Properties
On the second page, you are taken to Figure 2 where you define the SuiteBundle properties, this screen is largely used for publishing SuiteApp’s, but you can use this to provide useful information or notes with each update.

Figure 2. Step 2 - SuiteBundler Properties Page
-
Description - Briefly describe changes in the latest version update
-
Admin Documentation - Attach documentation for SuiteBundle.
We do not recommend changing the other default options unless you are building a SuiteApp for specific language or industries.
Select Objects
On the third screen, you are taken to the Select Objects wizard shown in Figure 3 where you select the various objects you wish to include in your bundle.
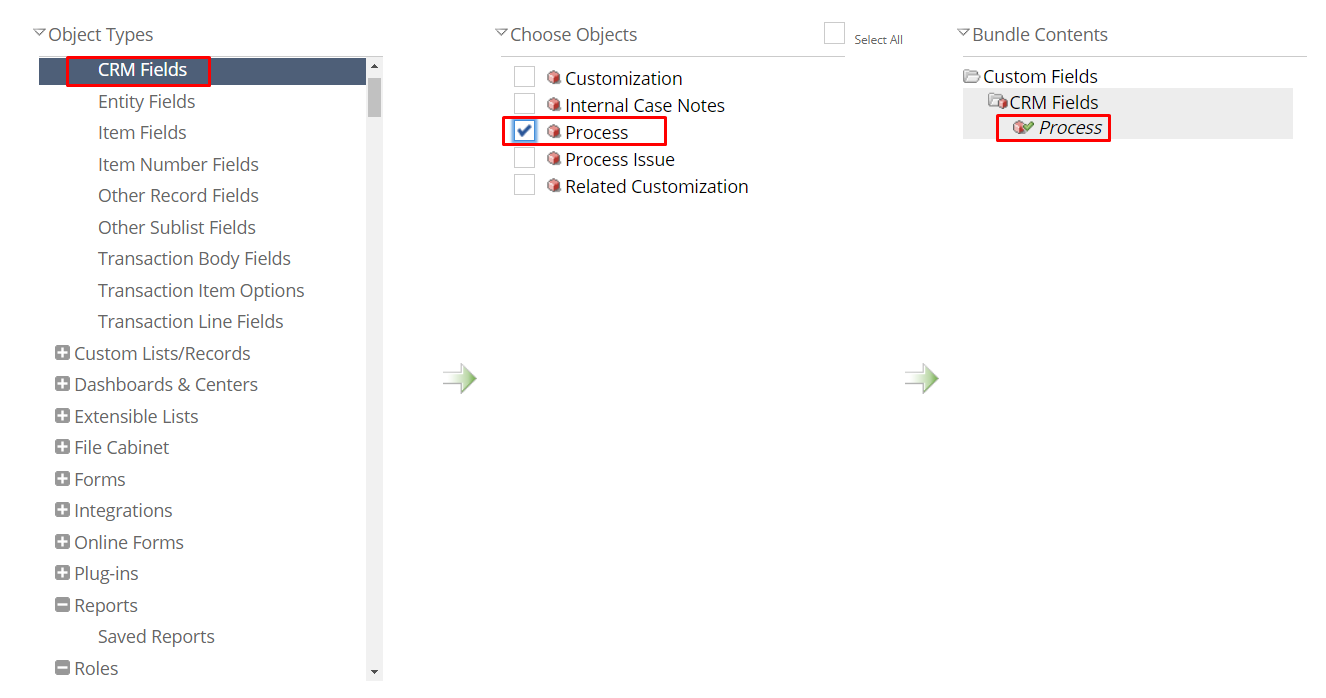
Figure 3. Step 3 - SuiteBundler Select Objects screen
To select the desired objects in the SuiteBundle, first select the type of object in the first pane. In the example shown above in Figure 3, the Custom Fields group has been expanded in the leftmost pane and the CRM Field Process has been selected in the middle pane to be included in the bundle. The third pane gives an overview of what has already been selected for inclusion in the Bundle. Note, this list is not comprehensive and additional object may be “picked up” by the SuiteBundler in the next screen, “Set Preferences”, that were not intended for the SuiteBundle.
Set Preferences
This screen shown in Figure 4 will list all objects you have selected in the previous screen and those that have been included due to a dependency. If this is the first time an object has been added to the bundle, it should say what object is referencing the dependency.
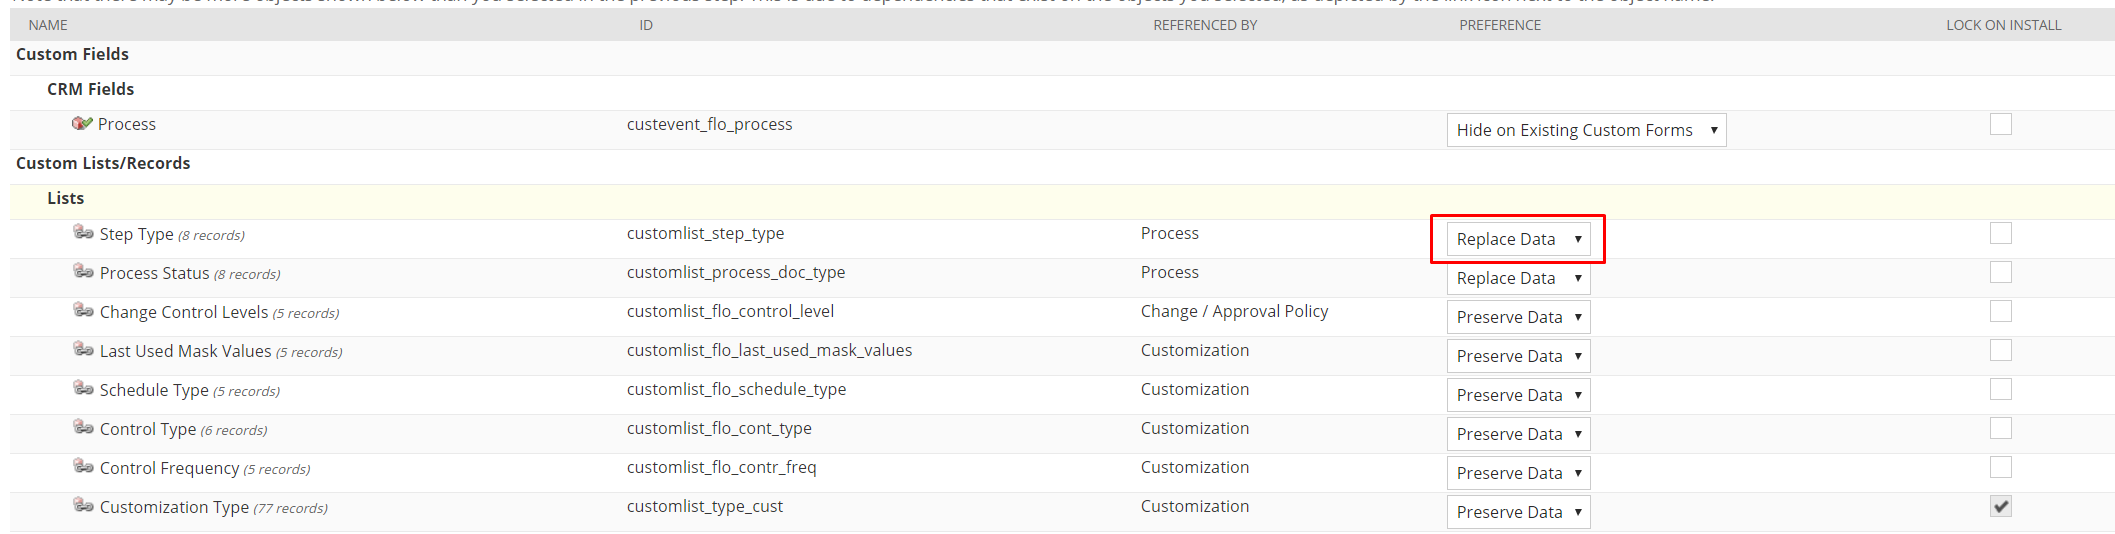
Figure 4. Step 4 - SuiteBundler Set Preferences Screen
Lock on Install - If the SuiteBundle is to be deployed to multiple clients and you need consistent functionality, you can lock the objects from being customized by checked the ‘Lock on Install’ box. If the box is checked by default, the object is part of a 3rd managed bundle and will remain locked.

Figure 5. Lock On Install Option
Preferences - Most objects have an install preference you can set on this screen. These can be overridden when you install in the target environment, but setting them correctly will save time.
There are several preferences by object:

Figure 6. Set Field Visibility on Forms
-
Hide on Existing Custom Forms - New object will not be added to display on all custom forms. If unsure, select this option.
-
Show on Existing Custom Forms - New object will be displayed on all custom forms. Only select if object will be on all forms.
All custom forms have options for which fields are displayed. This option enables the custom fields in the bundle to be deployed to all forms the customization is associated with. If you are unsure if this is applying to all forms, stop and contact the owner of the customization for guidance. 
Figure 7. Custom List/Record Record Value Preferences
-
Replace Data - Replace existing data in target environment with data from SuiteBundle.
-
Merge Data - Combine data in target environment with data from SuiteBundle. Review object after Deployment to ensure there are no duplicates
-
Preserve Data - If object already exists in target environment, do not modify it. If it does not exist (first install), then it is created.
Replace Data helps to maintain field consistency across the environments and is the recommended option. Use Preserve data if there are separate subsets of field data between environments for testing or development purposes. Merge Data is generally not recommended - there is a strong possibility for duplication if the results are not unique across lists.

Figure 8. Setting Preferred Forms via SuiteBundler
-
Preferred Form for Record Type - Use this form as the default choice for new records of its type.
-
Not Preferred - This form is not the default choice for new records.
Set Bundle Sharing
After saving, select the Set Availability option for the new SuiteBundle. By default, SuiteBundles are set Private so they are not available for use by anyone other than an Adminstrator of this account.
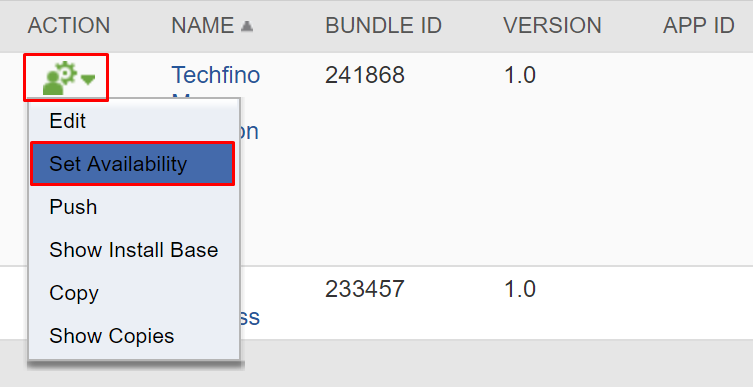
Figure 9. Set Bundle Availability
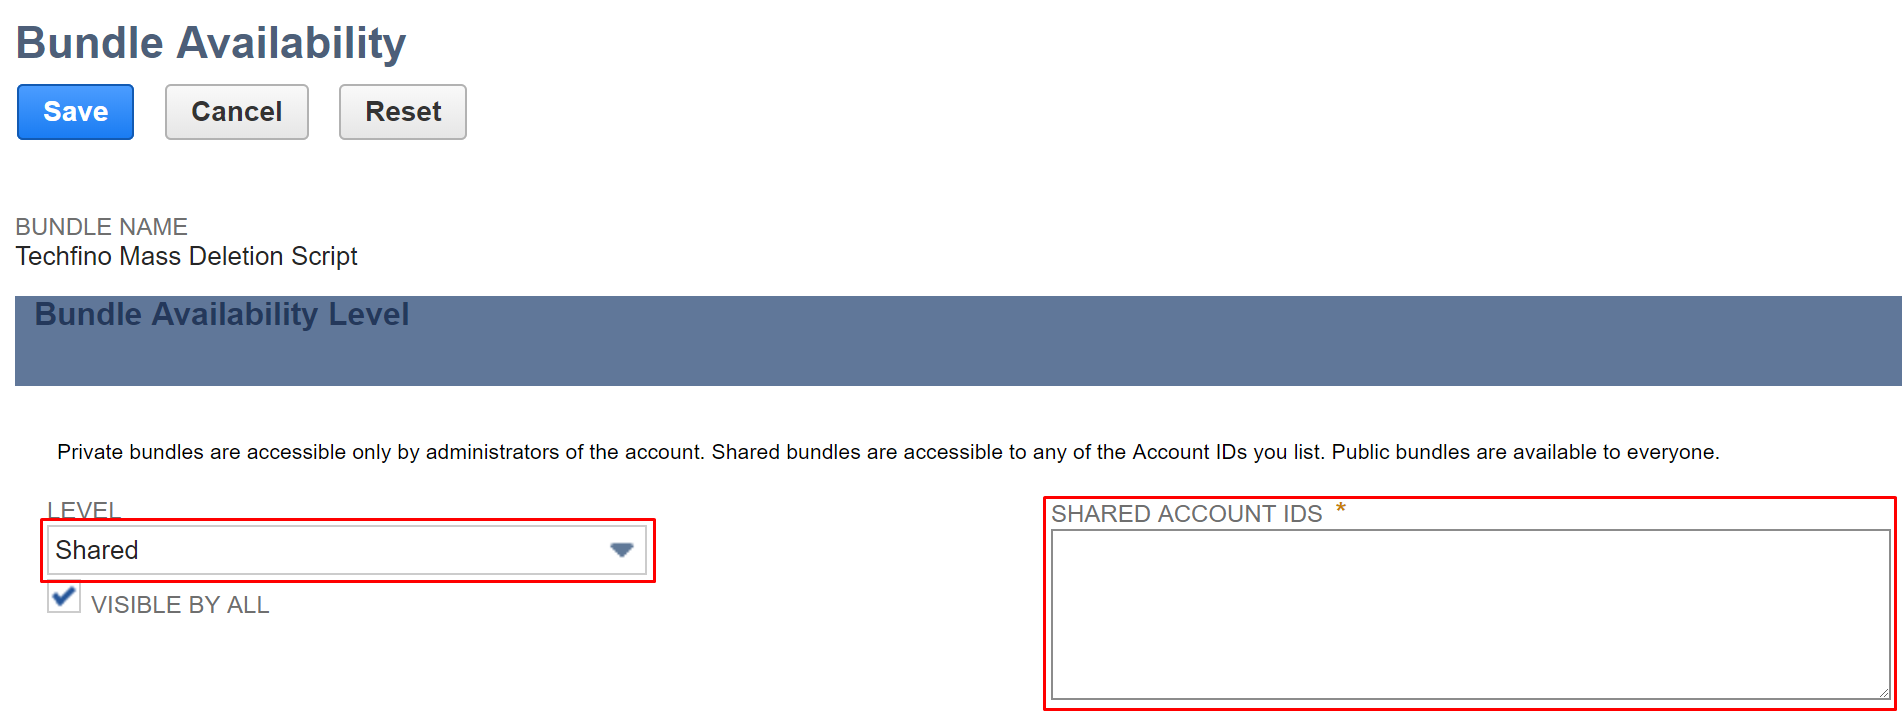
Figure 10. Set Bundle Availability
There are three options for bundle availability:
-
Private - Only accessible in other accounts to users who have Administrator access in the account where the SuiteBundle is created.
-
Shared - Administrators and other users with the SuiteBundler permission in accounts that are listed in the Shared Account IDs list can view and install the bundle.
-
Public - Any NetSuite administrator or user with the SuiteBundler permission can view and install a public bundle. NOTE - You cannot make a configuration bundle public.
Installing Bundles
Searching for New Bundles
To find and install a new SuiteBundle (or SuiteApp), simply navigate to the Search & Install Bundles page by clicking on Customization → SuiteBundler → Search & Install Bundles, as shown below in Figure 11:
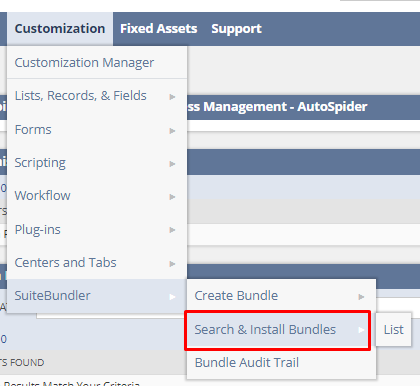
Figure 11. Finding Bundles to Install from Customization Menu
Next, select “Search & Install Bundles” to bring up Figure 12:
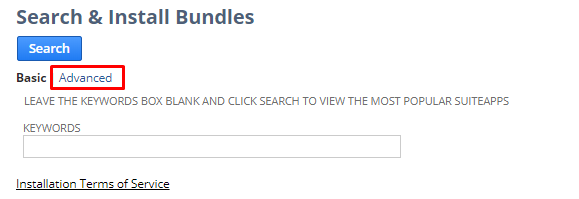
Figure 12. Finding Bundles to Install from Customization Menu
Click on “Advanced” to bring up Figure 13:
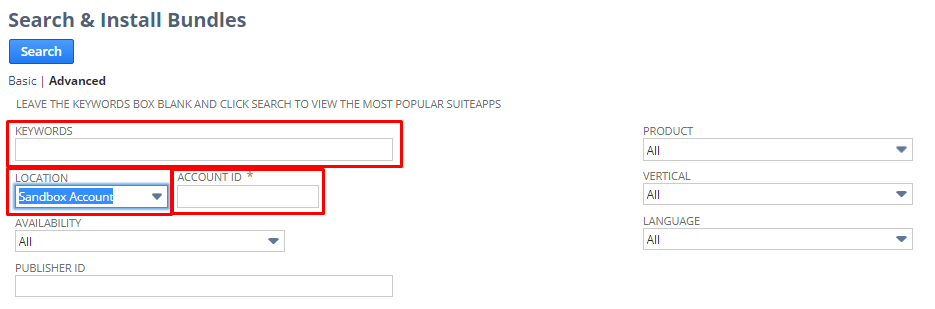
Figure 13. Advanced Search Screen for SuiteBundles
Set the location to “Sandbox Account”. Next, enter in the source environment ID for “Account ID”. If you created your SuiteBundle in the environment 123456_SB5, this is the Account ID you enter in the Account ID field. You can optionally enter in a keyword that you used in the name of the SuiteBundle you created.
Finally, click on the name of the SuiteBundle you wish to install.
Update Existing Bundle
Now to update the SuiteBundle or to review existing bundles installed in the current environment, select the List option under SuiteBundler → Search & Install Bundles, as shown below in Figure 14:
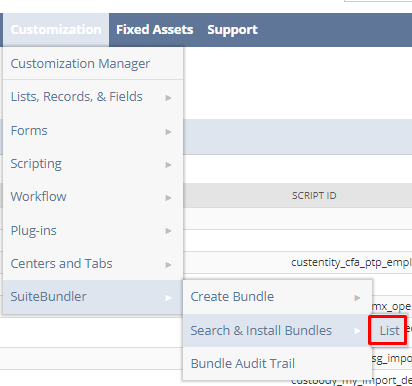
Figure 14. Listing SuiteBundles Installed in your NetSuite Account
The blue exclamation stamp next to a version number (see Figure 15) shows that a new update is available for a bundle. Note - if the bundle version number has not been modified, this stamp may not appear.

Figure 15. Bundle Update Notices
To update a bundle, mouse over the icon on the left side to bring a dropdown and select “Update”.
Install New Bundle or Bundle Update
It is important to note that if you install or update a SuiteBundle in a destination environment, you cannot control which items to install or update and which changes to ignore.
When using SuiteBundler to move changes made to locked Custom Records, such as the Fixed Asset Module’s Custom Records, it is important to note that any fields you add in the source account will become locked in any target accounts that they are later installed into. It may be necessary to instead make these changes manually in all environments instead of bundling them to prevent this locking from occuring. Once locked in Production, you are unable to break the locks without uninstalling the SuiteApp and re-Installing and re-creating all custom fields as need be. The potential for data loss in this situation cannot be underestimated.
If any documentation is attached to the SuiteBundle, it will be available as a link under “Admin Documentation” on the header. Clicking on “Components” will show all the objects contained within the bundle.
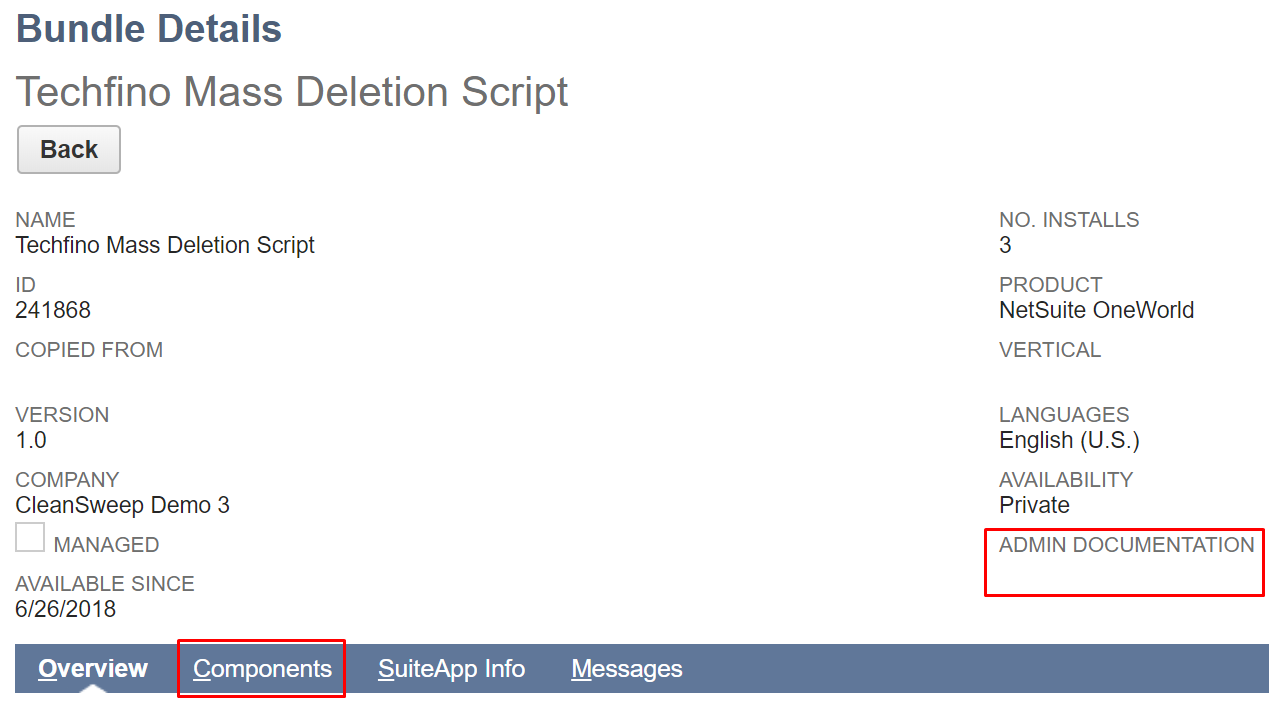 Figure 16. Bundle Details Screen
The components listing shown in Figure 17 gives you a detailed list of all customizations that are associated with the bundle you wish to install. There is an export option for CSV or Excel formats. When you’ve reviewed the components the bundle will install or update, click install to move to the Preview Bundle Update screen. Note, with larger bundles, this page can take a while to load.
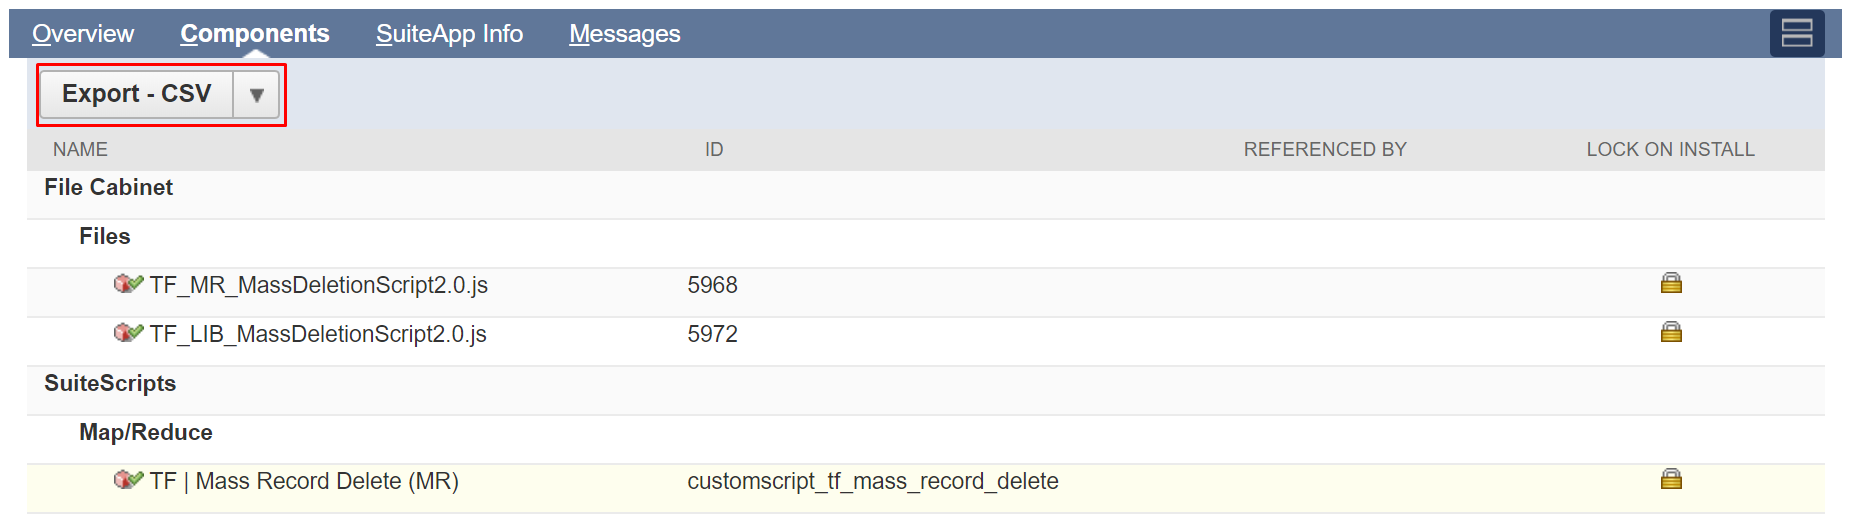
Figure 17. SuiteBundle Components
Once you have opted to install your new bundle, you will see the bundle status as “Pending…”, followed by “Installation Progress” and hopefully a Check Symbol. Sometimes, you may instead have a red cross with an error message. Sometimes this error message will return a code at the end of it. If this happens, you need to contact NetSuite support and supply them with the error code. They should be able to reference that code and give you feedback as to what went wrong with the SuiteBundling process in the backend.
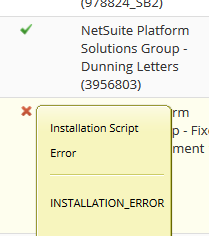
Figure 18. SuiteBundle Error!
The Preview Bundle Update screen depicted in Figure 19 will show what changes the Bundle install will have on the target environment. These options will reflect the preferences set in the Set Preference step of bundle creation.
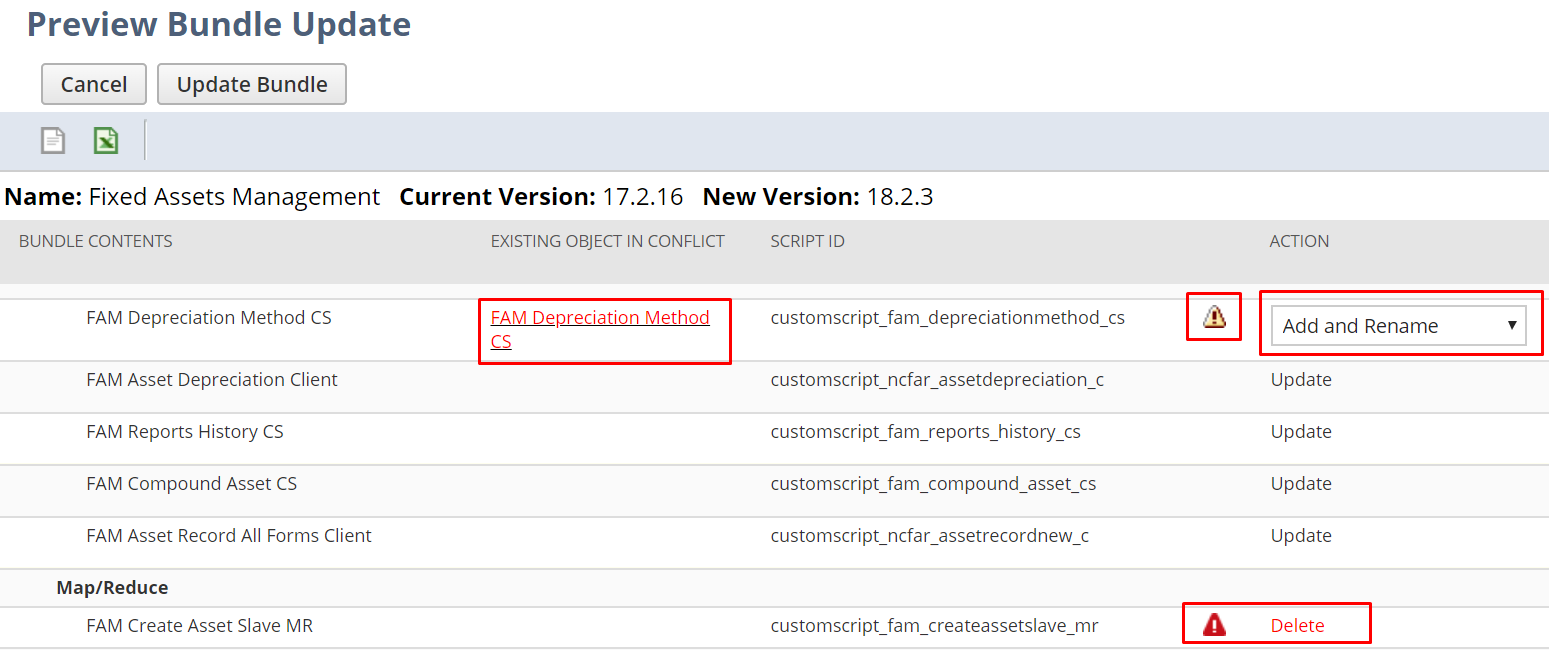 Figure 19. Preview SuiteBundle Update
As shown in the figure above, the conflicts will show with small warning symbols next to the action. Take care in addressing each conflict in the update. Unless there is a specific use case, do not use the “Add and Rename” option. Instead of updating an existing customization, it will create a new one with a number in parenthesis at the end and append a number to the end of its script ID. In the above example, this would create a Transaction Body Field named “Location (2)” with ID “custbody_location_2”. Instead, use the “Replace Existing Object” option.
All custom forms have options for which fields are displayed. Shown in Figure 20, this option enables the custom fields in the bundle to be deployed to all forms the customization is associated with. If you are unsure if this is applying to all forms, stop and contact the owner of the customization for guidance.

Figure 20. Use Caution when you see a Field Conflict
-
Hide on Existing Custom Forms - New object will not be added to display on all custom forms.
-
Show on Existing Custom Forms - New object will be displayed on all custom forms. Only select if object will be on all forms.
Data Copy Preferences for Custom Lists and Custom Records should be set carefully to prevent data loss. Figure 21 shows how these fields are displayed on Lists/Records:

Figure 21. Use Caution when you select the Data Copy Preferences on Lists/Records
-
Replace Data - Replace existing data in target environment with data from SuiteBundle.
-
Merge Data - Combine data in target environment with data from SuiteBundle. Review object after Deployment to ensure there are no duplicates
-
Preserve Data - If object already exists in target environment, do not modify it.
Replace Data keeps the fields consistent across the environments and is the recommended option. If there are separate subsets of data between testing environments, then Preserve Data may be used. Merge Data is not recommended.

Figure 22. Setting Prefered Forms
-
Preferred Form for Record Type - Use this form as the default choice for new records of its type.
-
Not Preferred - This form is not the default choice for new records.
Thanks for taking the time to read our introduction to SuiteBundling in NetSuite. Our next blog in this series will deal with some of the more nuanced issues that can arise with using the SuiteBundling tool and our recommendations on how to prepare for, avoid, and resolve them. Please leave us your questions or comments, we would love to hear your feedback!
Talk to a NetSuite Expert
Tell us what you're working on, and we'll help you figure out the next step.